Hyper V is a powerful virtualization utility in Windows 7. It allows you to run multiple operating system on one computer. Hyper V, when enabled, can cause issues because it can improve your performance by running older applications and services in a more favorable environment. Hyper V can cause problems with certain programs and services if it is disabled in Windows 7.
Step by step instructions on how to enable/disable HyperV
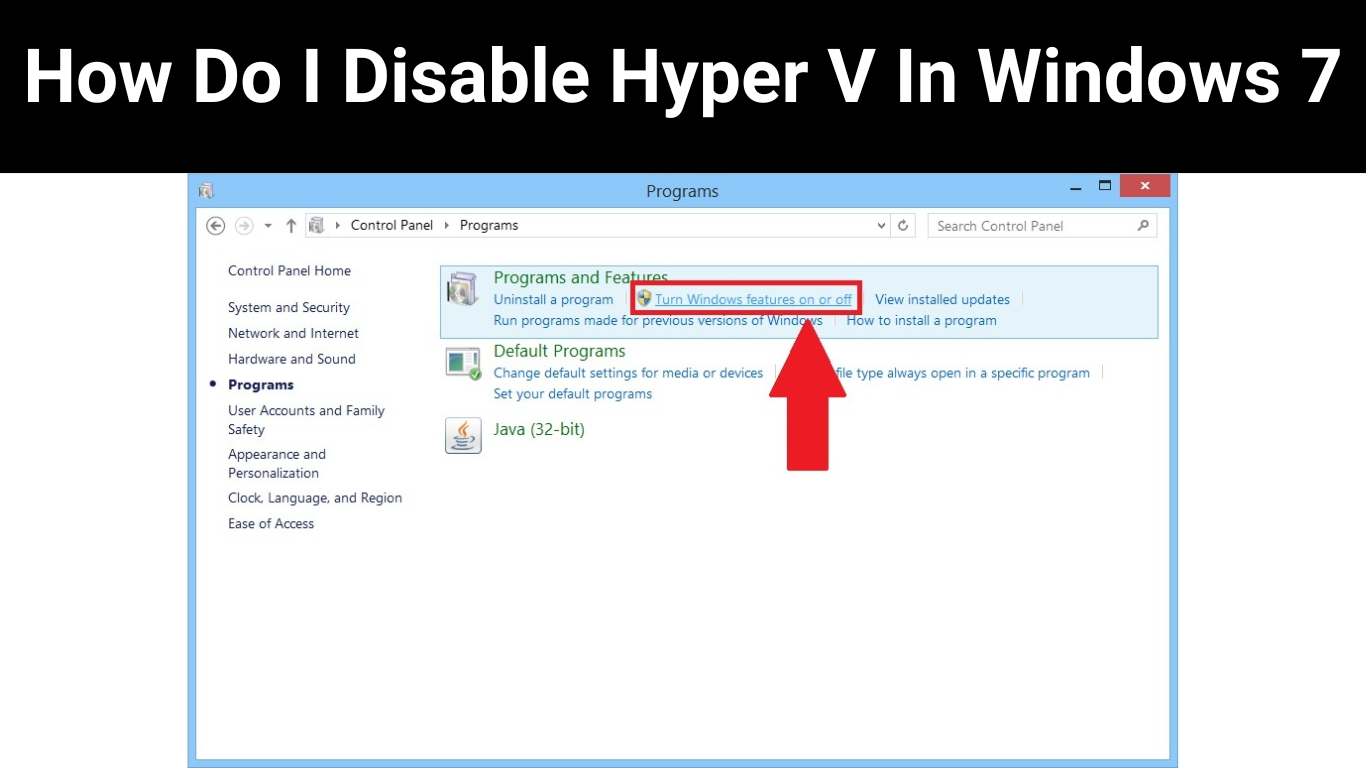
How can I disable Hyper-V completely?
You may notice that Hyper-V Server Update has disabled some features of your Hyper-V server. These steps will disable Hyper-V completely:
To see active network connections, open the command prompt by typing “netstat-an” 2. Look for Hyper-V in the output and click on it to see all connections. 3. Clicking on any inactive HyperV connection instances will remove them from your system’s Status List and make all active HyperV connections visible again. 4.
Hyper-V is missing from Windows 7.
Hyper-V is an option in Windows 7, however it is not default enabled. To activate Hyper-V, go to the Control Panel by clicking the (Windows icon) in the upper left corner. After activating Hyper-V, Hyper-V Manager can be used to start using it.
Is Hyper-V available on Windows 7?
This question is not definitive, since Hyper-V doesn’t appear to be available on Windows 7. It is possible that Microsoft decided not to include Hyper-V on Windows 7. However, this is not a guarantee. Hyper-V might only be made available via third-party extensions and add-ons. If you’re still using Windows 7, make sure to update Hyper-V drivers and tools.
How do I disable Hyper-V by using a command prompt
How to disable Hyper-V with the command prompt You can disable Hyper-V from a command prompt if you’re working on Windows computers. Open a cmd window, and then type “cmd”, into the text box. Next, hit Enter. Next, press Enter.
The netstat -an output should display the status of all network connections on your computer. If Hyper-V is detected, it will be listed in the network list. If Hyper-V is not enabled, it will not appear in the netstat output.
How can I tell if Hyper-V has been disabled?
Hyper-V allows administrators to create virtual machines locally and then run them from the Microsoft Hyper-V server. Hyper-V may become unresponsive if there are any issues. You can use the following methods to check if Hyper-V has been enabled:
Open theTaskManager and choose hyperv.exe from context menu. This will display a list with all Hyper-V tasks. Open a command prompt on your computer and type “netstat-a” This will display all network interfaces in your system. Hyper-V will be enabled on your computer system if there are entries for the term “hyperv”.
What happens if Hyper-V is disabled?
Hyper-V can cause significant performance issues for a computer, especially when it is used with other Hyper-V features. You may have to take steps to reduce any performance problems if Hyper-V is disabled.
How can I enable or disable Hyper-V in Windows 7
Hyper-V will be used if Windows 7 is your primary desktop environment. It allows administrators to easily create multiple operating systems that are isolated from each other. Hyper-V may not always be available due to vendor restrictions or limitations. How do you disable Hyper-V in Windows 7 when this happens?
What is Hyper-V and why should I have it installed on my computer?
Hyper-V, a Microsoft Windows operating-system feature, allows multiple computers to run as one. Hyper-V allows applications to run side by side without conflicting. It creates a virtual machine (or “workstation”) on each computer system. Hyper-V protects systems by making them more immune to viruses and other malware.
How do I enable Hyper-V within Windows 7 BIOS
Many users have asked how to enable Hyper-V within Windows 7 BIOS. This question is dependent on the computer that you use and your BIOS version. This guide will show you how to enable HyperV in Windows 7 BIOS.
- Find the Hyper-V tab in the BIOS Settings.
- Scroll down to find the option “Enable HyperV.”
- Click the OK button and check the box next to “Yes”.
- Restart your computer by closing the BIOS Settings.
Virtualization is enabled in Windows 7
Virtualization has been enabled by default in Windows 7. Virtualization allows you to run programs on another computer. You might not be comfortable with virtualization so you can disable it before installing any new software.